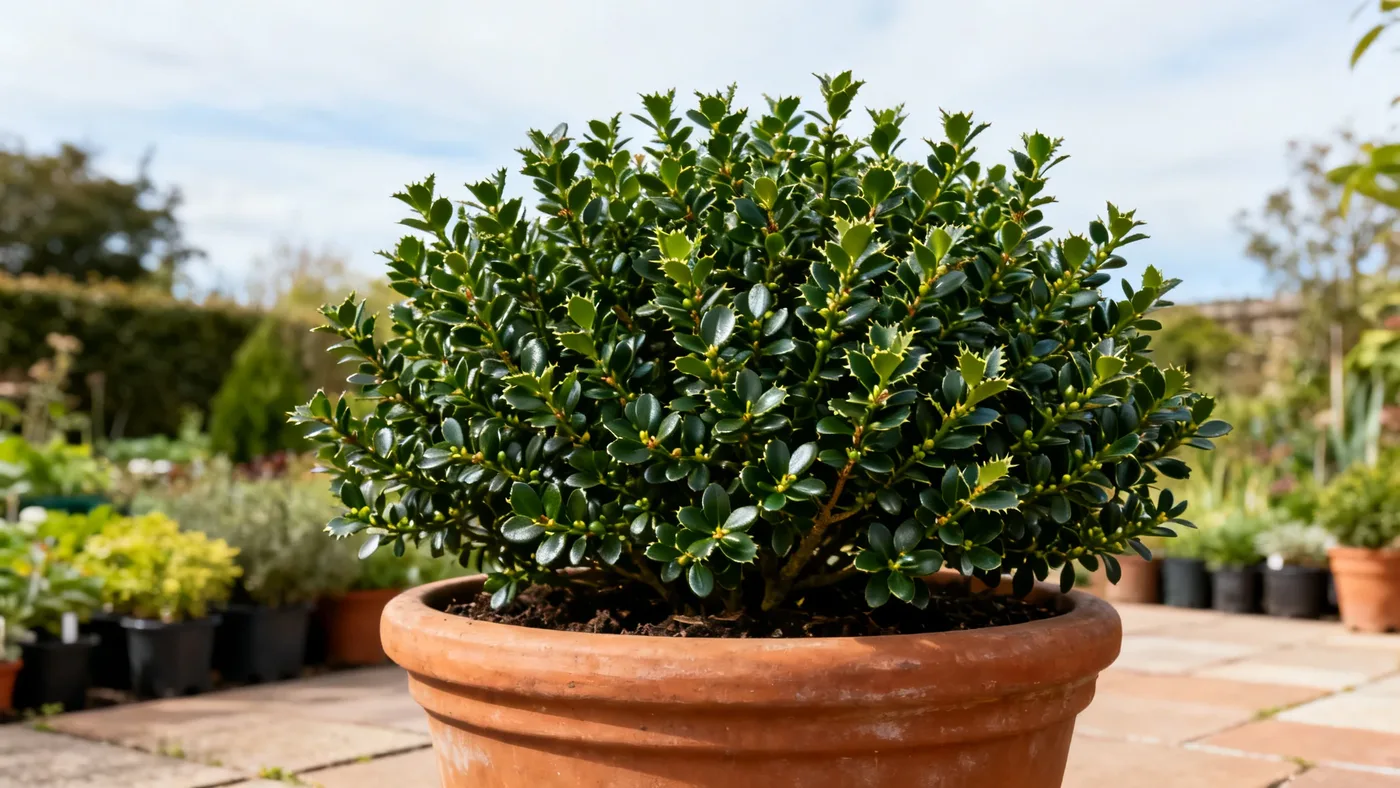
Compact Japanese Holly Buying Guide: Container Sizes to Choose
If you're shopping for Compact Japanese Holly (Ilex crenata 'Compacta'), you've already picked a versatile evergreen that works as a low hedge, foundation planting, or specimen shrub. Now comes the practical part: figuring out which plant size to buy and what to look for when you're standing in a nursery or browsing online. This guide walks you through container sizes, quality indicators, and where to find healthy specimens so your new holly thrives.
What to Look For When Buying Compact Japanese Holly
A healthy Compact Japanese Holly plant shows several telltale signs, regardless of container size. Start with the foliage. Leaves should be small (under 1 inch), dark glossy green, and oval-shaped with finely toothed margins. If foliage looks pale yellow or washed out, that's often a sign of alkaline soil damage (chlorosis), and the plant will struggle in neutral or alkaline garden soil. Pass on it unless you're committed to heavy soil amendment.
Check the stems. They should be firm and woody, not brittle or soft. A quick visual scan lets you spot branch density too. Compact Japanese Holly naturally develops a dense, mounded form, so look for plants with branching that starts low on the stem rather than a sparse, leggy structure. If a plant is tall and thin, it either stretched looking for light or wasn't pruned properly at the nursery.
Gently run your fingers along the soil surface. It should be consistently moist but not waterlogged or soggy. Wet, compacted soil at the base is a red flag for root rot risk. If the soil pulls away from the container edges or feels bone-dry, the plant has been neglected and may have root damage that won't show until weeks after you plant it.
Look for visible pests or disease. Spider mites are common on broadleaf evergreens, especially in warm or dry conditions. Tiny webbing on undersides of leaves or stippled (speckled) foliage means spider mites are present. Scale insects appear as small bumps on stems. These can be controlled, but starting with clean plants saves you weeks of management.
Understanding Compact Japanese Holly Container Sizes
Nursery-grown Compact Japanese Holly is typically sold in three standard container sizes. Each offers different tradeoffs between cost, establishment time, and landscape impact.
Quart Containers
A quart container holds a small plant, usually 6 to 12 inches tall. These are the entry-level option and the most affordable choice. They're lightweight and easy to transport, making them practical if you're buying several plants for a hedge. The tradeoff is clear: these young plants grow slowly (3 to 6 inches per year), so it takes longer to fill out a space or reach mature height. For a continuous low hedge planted on 3-foot spacing, you might plant a quart-sized specimen and wait 2 to 3 years for it to merge visually with neighbors. Quart plants also need consistent watering and closer monitoring during the first season since the small root ball dries faster.
#1 Containers
A #1 (one-gallon) container holds a noticeably larger plant, typically 12 to 18 inches tall with established branching. This is the sweet spot for most home gardeners. A #1 plant has a more developed root system than a quart plant, which means faster establishment in your garden and earlier visual impact. The growth rate remains slow (3 to 6 inches per year), but you're starting from a more substantial base. If you're creating a hedge on 3-foot spacing, a #1 plant bridges the gap between that young quart specimen and a mature shrub in roughly 1 to 2 years. Price-wise, #1 plants cost more than quarts but far less than larger sizes, making them economical for multi-plant projects.
#3 Containers
A #3 (three-gallon) container holds a mature-looking specimen, often 18 to 24 inches tall with full branching. This is instant landscape impact. There's almost no establishment period; a #3 plant looks designed-in from day one. The larger root ball and established structure also mean less watering stress during the first season. The downside is cost and logistics. A #3 container is heavier and bulkier, requiring more careful handling and transportation. You'll pay significantly more per plant, so #3 specimens make sense for high-visibility spots like foundation plantings or when you want an immediate focal point, not for a full hedge row.
Quality Indicators at Every Size
Container size doesn't excuse poor plant health. A quart-sized plant should still show dense branching from the base, clean foliage, and properly balanced moisture in the soil. A #3 plant should not have circling roots poking out of drainage holes (a sign of being rootbound too long) or major stem damage.
All healthy specimens, regardless of size, have firm stems that don't bend or snap easily. The soil should drain freely when you water; if water pools on top or never seems to drain, that's poor potting mix and a sign the plant was sitting in stagnant conditions.
For Compact Japanese Holly, dense foliage close to the soil line matters. If lower branches are bare or sparse, either the plant was grown too hot and dry, or it wasn't pruned to encourage low branching. This will take years of pruning to correct in your garden.
Comparing Price Tiers and Making Trade-offs
Nurseries price Compact Japanese Holly based on container size, age, and quality, but exact prices vary widely by region and vendor. As a general framework, quart containers are the budget option, #1 containers offer the best value for most projects, and #3 containers command premium pricing for immediate results.
If you're planting a hedge of 10 or 15 plants, buying smaller containers and spacing them properly will cost less upfront and deliver a full hedge in 2 to 3 years. If you're planting a single specimen in a prominent spot, stepping up to a #3 container justifies the cost because you'll see the benefit immediately.
Consider your timeline and maintenance budget together. A smaller plant is cheaper but requires more consistent watering and weeding in its first season. A larger plant reduces that early care burden but costs more at purchase. Both approaches work; the right choice depends on your priorities.
Red Flags to Avoid
Skip plants with yellowed or mottled foliage unless you're willing to test your soil and amend it heavily. Compact Japanese Holly prefers acidic, well-drained soil (pH 5.0 to 6.5), and it shows stress quickly in alkaline conditions. This isn't impossible to fix, but it requires commitment.
Avoid plants with leggy, sparse branching or bare stems near the base. A young plant can't fill in those gaps on its own; you'll need years of pruning to achieve the dense form that makes Compact Japanese Holly valuable in the landscape.
Pass on plants with visible pest damage (webbing, stippled leaves, bumps on stems) unless you're experienced managing these issues. Spider mites and scale insects can spread to nearby plants and become a garden-wide problem if not caught early.
Be cautious of plants potbound so severely that roots circle the soil ball or have broken through drainage holes. These plants struggle to establish normally after planting and may stall for a year or more.
If the soil is bone-dry or waterlogged, the plant has been neglected. Once roots are damaged by drought stress or rot, visual symptoms appear weeks or months after planting, not at purchase time.
Where to Buy Compact Japanese Holly
Local retail nurseries and garden centers are a good starting point. You can see plants in person, assess quality immediately, and get advice from staff familiar with your local climate. Nurseries in zones 6, 7, and 8 typically stock Compact Japanese Holly in spring and fall, which are the best planting seasons for this shrub.
Regional specialty nurseries that focus on evergreens or native/adapted plants often have stronger stock and more expert guidance than mass-market retailers. If you're buying in quantity (10 or more plants), specialty growers sometimes offer volume discounts.
Online nurseries ship dormant or bare-root plants in spring and fall. This gives you access to a wider selection, but you can't inspect plants before purchase. Read reviews carefully, and look for vendors who guarantee healthy arrival and offer replacement guarantees if plants arrive damaged.
Mail-order sources are particularly useful if you're looking for specific container sizes or if local nurseries have limited stock. Shipping costs matter more for smaller plants, so factor that into your total cost calculation.
Whichever source you choose, purchase in spring (March to May) or early fall (August to September). These are the ideal planting windows for Compact Japanese Holly, and nurseries have the freshest stock during these periods.
Planting and Establishment After Purchase
Once you bring your plant home, don't let it dry out. Water it well the day you plant, and keep soil consistently moist (not soggy) for the first season while the root system spreads into the surrounding soil. Compact Japanese Holly does best in full sun to light shade with well-drained, humus-rich soil.
If your soil is alkaline or compacted, amend it with compost and peat moss before planting. This makes a real difference for long-term health. For spacing, allow 3 to 4 feet between plants if you're creating a hedge, or 4 to 5 feet for a specimen or foundation planting.
Light fertilizing helps new plants establish. Use a balanced or acid-forming (holly/azalea-type) fertilizer in early spring of the first year. Avoid heavy feeding, which pushes soft growth susceptible to pests and weather damage.
For detailed aftercare, prune timing, and long-term management, see our comprehensive care guide. Pruning in late winter to early spring before new growth flushes keeps plants dense and shaped. Compact Japanese Holly responds well to light annual shearing, and it can handle heavy renewal pruning if it ever gets leggy.
Quick Reference: Container Size Comparison and Selection
| Container | Typical Height | Root System | Establishment Time | Best For | Key Consideration |
|---|---|---|---|---|---|
| Quart | 6-12 inches | Small, developing | 2-3 years | Hedges, budget planting, patient gardeners | Needs consistent water; more monitoring first year |
| #1 (1-gallon) | 12-18 inches | Established, mature | 1-2 years | Most home projects, mixed plantings, value option | Best balance of cost, quality, and speed |
| #3 (3-gallon) | 18-24 inches | Fully developed | First season minimal | High-visibility specimens, instant landscape | Premium price; plan delivery and planting |
Pre-Purchase Checklist
- Foliage color is dark glossy green; no yellowing or washed-out appearance
- Branches start low on stem; plant shows dense form, not sparse or leggy
- Soil is moist but well-drained; not waterlogged or bone-dry
- No visible webbing, stippled leaves, or scale bumps on stems
- Stems are firm and woody; roots not circling or protruding from drainage holes
- Container size fits your budget and timeline (quart for patience, #1 for balance, #3 for immediacy)
- Purchase in spring or early fall for best establishment